

How to Make a Concertina Sketchbook
So many people use them, so many people love them. What is a concertina sketchbook and why do I love them so much?
Concertina Sketchbooks – What Are They?
A concertina sketchbook is a sketchbook that is bound in a non-traditional way so that there is effectively just one long page (sometimes 2m long or more) that is folded like an accordion into a sketchbook size, sometimes 16 or more folds. You can buy them in many different shapes, sizes, weights, orientations and lengths. And you can also make them, which is great because they can be quite expensive to buy. This blog is about how I have found to make the best size for me, with the best paper quality and weight for the media I use, allow me to customize the covers, and very importantly NOT SPEND TOO MUCH MONEY.
But why should I go to so much trouble? Because concertina sketchbooks are wonderful. Let me count the ways..
10 Reasons Why I Love Concertina Sketchbooks
There are so many different reasons to love a concertina sketchbook. Here are all the reasons I can think of, but if I have missed any, please let me know in the comments below:
- They can be worked on as one long work of art or as separate pages each with their own drawing on it.
- They can be enjoyed as one long work of art or they can be paged through like a traditional sketchbook.
- They can be BOTH AT ONCE (this is challenging and the best part I think).
- They can be created as a portrait or can be folded in landscape mode.
- They can be hung from high up and fall down like a Japanese scroll.
- They can be laid out horizontally on the floor, held on a shelf, laid out on a table, or hung horizontally.
- They form a natural horizon, which is great for landscape painters.
- They create a natural narrative, great for a longer period of work.
- You can work on more than one page at once – for example if like me, you work with wet media and you work fast, concertinas allow you to keep working on a new part of the paper while the first bit is drying.
- You can store what is effectively a large work of art in a very small compact space, and keep it well protected.
Did I miss any reasons? – let me know in the comments below!
What is the Best Paper Weight and Size for a Concertina Sketchbook
A lot of concertina sketchbooks sold in art stores come in heavy weight water colour paper. However, if I am making my own, I find 300 gsm or 310 gsm almost too heavy to fold into a traditional concertina. The folds are thick and the paper does not sit well in a bound state. And perhaps because the height is relatively small compared to the weight of the paper, I have found that even with many layers of media I did not need the heavier 300-350 gsm -paper weight. After many experiments, I have settled on a beautiful paper that is 220 gsm.
Lana makes an archival multi-media drawing pad at 220gsm weight called Dessin 220. 50 pages of A2 costs around $65 AUD at Parkers Art Supplies in Sydney. This paper carries a lot of medium, it’s a really nice weight. With two sheets of A2 paper I get sixteen A5 sized pages in a single sketchbook. So for $65 I can make 25 concertina sketchbooks, which equates to a little over $2 for each one. And if I want to make a bigger sketchbook I can add one or two more sheets and get a 24 or 32- page sketchbook, and so on. Try different sizes to see which one suits you best. I have found, because of the way I work, that 16 A5 pages is a perfect.
Materials Required to Make an A5 Size Concertina Sketchbook
The only products needed to make a concertina sketchbook are:
- Two A2 220gsm weight drawing paper
- 1” wide (2.5 cm) white cloth book binding tape (or any acid free tape you like)
- Cardboard (you can even use a cereal box!)
- PVA (white glue, clear mat paint medium, collage medium)
- Something to collage the covers with that relates to sketchbook – tissue paper, fabric, maps, photographs, collected bits
How I Make the Best Concertina Sketchbook (for me!)
There are many ways to make a concertina sketchbook and the internet is full of tutorials, but this straightforward and simple way works the best for me. Although this is a VERY simple process, strangely I have not found a tutorial on this method on the internet. Hence this blog!
Take two sheets (or more if you want a longer sketchbook) of A2 220gsm acid free paper.
Fold them each in half lengthwise, EXACTLY. Line up the longer edges so your fold is perfect. (I find this a much better solution that measuring and drawing a line. The fold irons out over time, and there is no pencil mark to try to erase, which inevitably smears grey all over.)
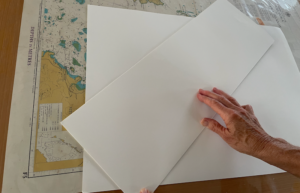
Cut exactly along the edge.

Do this for the second piece of A2 paper as well. You should have four long sheets of paper.
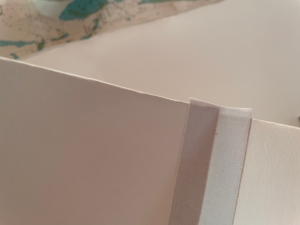
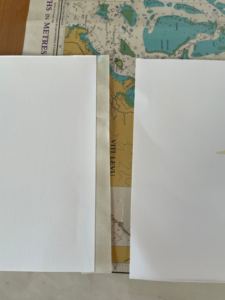 Cut three pieces of tape that are a little longer than the shorter edge of each of the four papers. Place the tape sticky side up.
Line two shorter edges of paper up so the pre cut edges are at the bottom. Place one on the tape so only half the tape sticks to the first long piece of paper and then fix the other one to the other half of the tape, making sure the edges line up exactly at the bottom.
Repeat this process with the next two pieces of paper until you have a very long (2m +) piece of paper. MAKE SURE YOU ALWAYS PUT THE TAPE ON THE SAME SIDE OF THE LONG PAPER AS YOU MAKE IT. (You don’t want one paper with tape showing and the other without.)
Line up the long paper of four sheets taped together on a table or clean working surface with the tape facing down and the cuts facing up.
Fold the first paper in half by aligning the far left hand edge of the paper to the first cut.

Then fold this sheet backwards on itself along this first fold you made.

Take this middle fold and align it with the first cut.

Next, fold the far left edge to the first cut.

You will now have made the first four pages of your concertina sketchbook.
Do this same process with the second of the four pieces you have taped together, bringing the full four first pages with you as you make your first fold of the second piece of paper.
Then repeat steps 10-13 with the second of the papers you have taped together. Fold the second sheet back on the fold already made and then bring that fold to the second cut. Fold the final part of the second sheet to the second cut.

Repeat this process for the third and fourth pages. You now should have an A5 size concertina sketchbook of 16 pages.

You can trim any tape that hangs over the edges by folding it in half along the cut and trimming from the edge side with scissors.

FINALLY: make sure when you work into your sketchbook that you draw on the side without the tape!
Customizing the Sketchbook Covers
This is the fun bit. And I like to leave this until the end. This is because when I work into the sketchbook, I don’t always know how it will turn out. I also don’t know what I might find along the way to use as a cover.
Chose a material or materials for the cover that you feel is appropriate for the content of the sketchbook, that lends itself to being collaged. Fabric, tissue paper, old letters, maps, photographs, dead leaves, anything goes!
Cut two pieces of A5 sized cardboard for the ends. Cover these each on one side only with the collage materials you have chosen and with the PVA. It does not matter what the other side looks like, so you can tuck ends of fabric, or paper around the edges, but make sure something wraps around the edges. Let this dry hard and dry.
Next lay the concertina sketchbook with the tape sides facing down and your work facing up. Fold over the first page. It is this side you will be gluing to your book cover.
Cover the first page with a light, even layer of PVA and place your book cover on top. Hold this in place, making sure it lines up exactly to your papers, until it starts to set. You want the cover to protect all your beautiful work.
Do this same process with the last page of your concertina, gluing the second book cover to the last page on the back.
And Voila! Your gorgeous, cost effective, super fun concertina sketchbook!
Let me know if you have any questions, or I have not been clear enough. It really is a simple process.
I just like the helpful information you provide in your articles
Thank you so much for sharing such a helpful and insightful news
and information on your blog! I find your articles, advice and point of view
to be extremely valuable and practical. Your expertise really shines
through, and I appreciate the effort you put
into providing such valuable content.
I’ve already shared a number of your posts on my social media channels, including X, Facebook, Medium, Instagram, YouTube, and Tumblr.
Additionally, I’ve provided my followers with a bookmarked link to your
post so they can benefit from your wisdom and insights as well.
I look forward to following your blog for more great updates.
Keep up the fantastic work!
I’m often to blogging and i really appreciate your content. The article has actually peaks my interest. I’m going to bookmark your web site and maintain checking for brand spanking new information.